
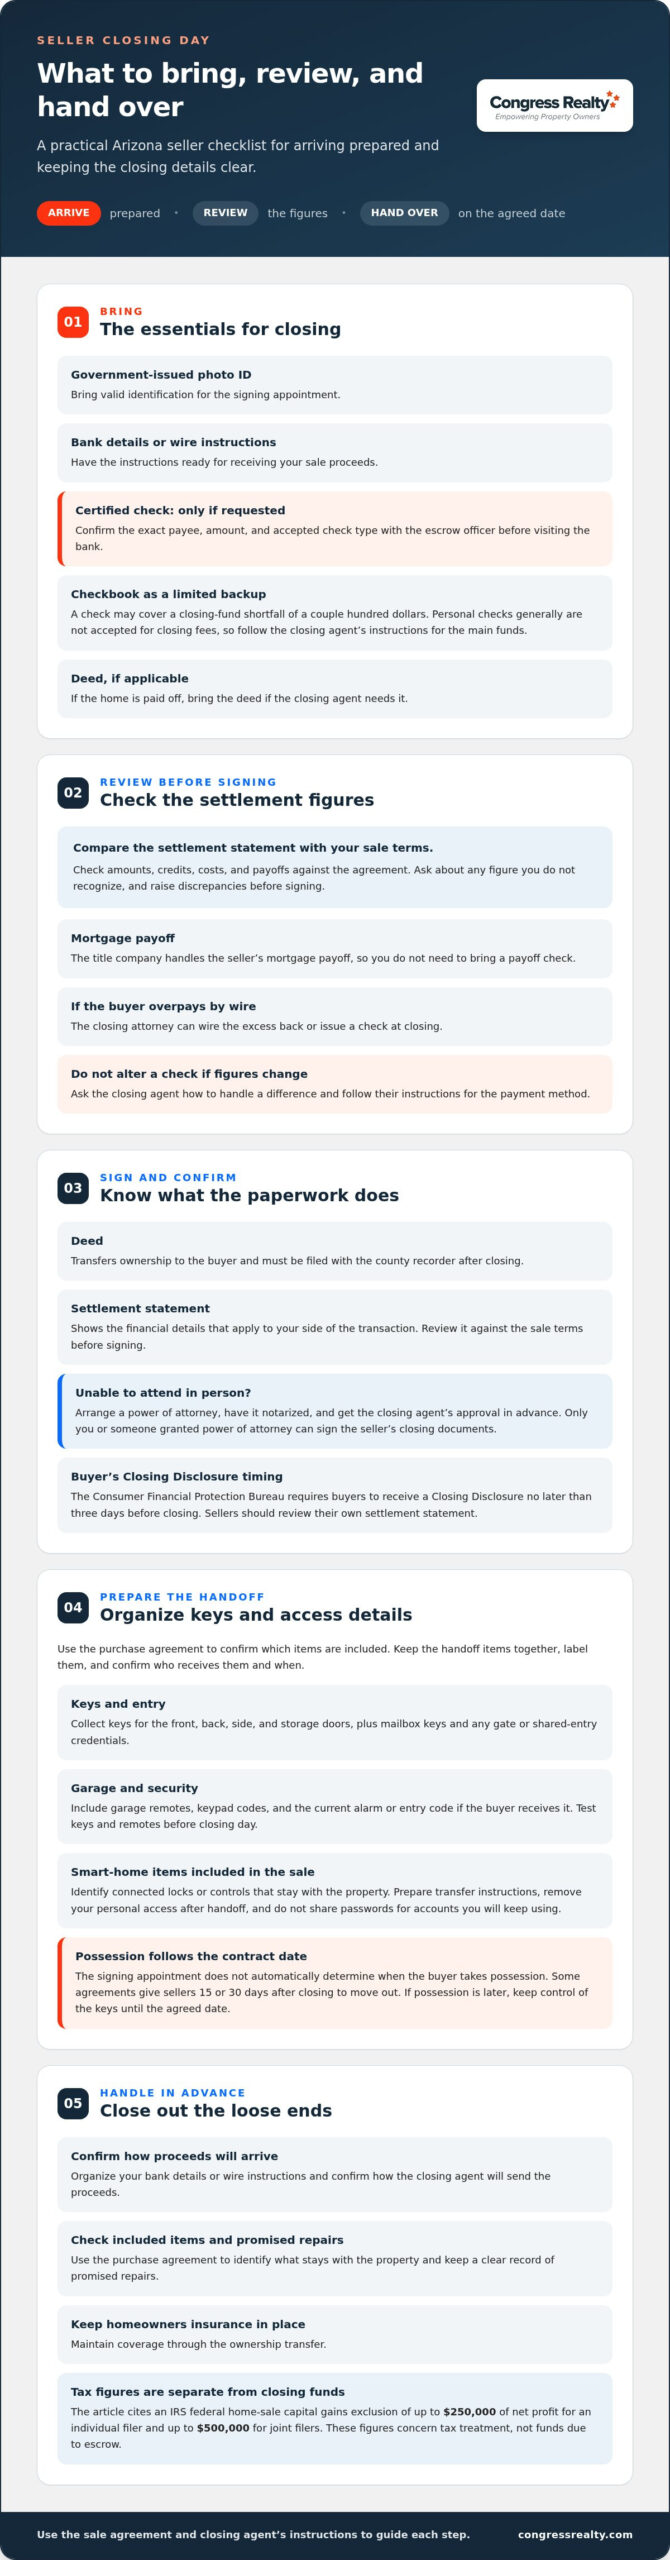
Congress Realty provides flat-fee MLS listings in Arizona for homeowners preparing to sell. When considering what to bring to closing as a seller, start with a valid government-issued photo ID, your bank details or wire instructions for proceeds, and a certified check only if the escrow officer requests one. Bring keys and access items if the buyer takes possession at closing.
Closing day involves more than signing papers. Review the closing statement and compare its figures with your sale terms, including costs, payoffs, and proceeds. Raise any discrepancies before signing.
Prepare for a smooth handoff by organizing your documents, confirming how the closing agent will send your proceeds, and following the agreed possession date. This checklist covers what to prepare, review, sign, hand over, and handle in advance, so you can arrive organized and stay in control.
Key Takeaways
- Plan for any closing-fund difference by understanding how the closing agent handles a shortfall or excess.
- Match the property handoff to the possession terms in your sale agreement, including when the buyer takes over.
- Know which documents transfer ownership and which confirm the sale’s financial details before you sign.
- Use the purchase agreement to identify included items and keep a clear record of promised repairs.
- Handle key pre-closing tasks early, including paperwork delivery and keeping homeowners insurance in place through the ownership transfer.
Checkbook for final closing-fund discrepancies
Knowing what to bring to closing as a seller means preparing for the expected settlement and any last-minute discrepancy. Bring valid government-issued photo identification and a certified check only if the escrow officer requests one. If the home is paid off, bring the deed if the closing agent needs it. Keep payment instructions handy for any proceeds sent to you.
- Bring a certified check only if requested. Get the exact payee and amount from the escrow officer.
- Carry a checkbook as a backup. A check may cover a closing-fund shortfall of a couple hundred dollars.
- Don’t rely on a personal check for closing fees. Personal checks generally aren’t accepted for those payments.
- Review the settlement figures. Compare amounts, credits, and payoffs against the sale contract before signing.
Use this checklist of what to bring to closing as a seller alongside the settlement statement. Check that credits and payoffs match the agreement, and ask about any line you don’t recognize. A checkbook may help cover a small difference, but it doesn’t replace the payment method the escrow officer requires for the main funds.
Don’t assume certified and cashier’s checks are interchangeable. Follow the closing agent’s instructions about which type to bring. Before visiting the bank, confirm the payee, amount, and accepted payment method. If a figure changes after you obtain a check, ask the closing agent how to handle the difference rather than altering the check yourself.
A checkbook is a limited backup, not your main payment plan. A shortfall of a couple hundred dollars may be covered by a check at closing. If a buyer overpays by wire, the closing attorney can wire the excess back or issue a check at closing. The title company handles the seller’s mortgage payoff, so you don’t need to bring a payoff check.
The federal capital gains tax exclusion for a home sale covers up to $250,000 of net profit for an individual filer, according to the Internal Revenue Service. For joint filers, it covers up to $500,000 of net profit, according to the Internal Revenue Service. These figures concern tax treatment, not funds due to escrow.
What should a seller do if they cannot attend closing in person? Arrange a power of attorney, then have it notarized and approved by the closing agent in advance. Only you or someone granted power of attorney can sign the seller’s closing documents.
The Consumer Financial Protection Bureau requires buyers to receive a Closing Disclosure no later than three days before closing. Sellers should use their settlement statement to review the amounts that apply to their side of the transaction.
Keys, garage remotes, and property access details
Make a separate handoff checklist for every entry point the buyers will use. If possession transfers at closing, gather house keys, garage door remotes, mailbox keys, and security codes. Include side doors, gates, sheds, and any detached garage. Compare the list with the purchase contract so you hand over what the sale includes, not items you plan to keep.
- House keys: Collect keys for the front, back, side, and storage doors.
- Garage access: Bring each garage door remote and any keypad code.
- Mail and gates: Add mailbox keys, gate fobs, and shared-entry credentials.
- Security access: Write down the current alarm or entry code if the buyer receives it.
- Smart-home devices: List connected locks or controls included in the sale and prepare their transfer instructions.
Keep the items together in a labeled envelope or small box. Mark each key by location, such as “back door” or “mailbox,” instead of leaving the buyers to test them. Test the garage door remote and keys before closing day. If an item doesn’t work, identify the problem and agree on a practical handoff plan before ownership changes.
Confirm who will receive the access items and when. If possession begins at closing, give the buyer the home keys and garage door remotes then. If your real estate agent or another representative will pass them along, package the items and label the recipient. Don’t leave keys inside the home unless that location is part of the agreed handoff plan.
Possession depends on the date written in the sale contract, not simply the signing appointment. Some agreements give sellers 15 or 30 days after closing to move out. If your contract sets a later possession date, keep control of the keys until that date and coordinate the transfer accordingly. Buyers should receive access when the agreed possession period begins.
For smart locks, cameras, thermostats, or alarm systems, identify which devices stay with the property. Prepare clear instructions for transferring access, and remove your personal access after the handoff. Don’t share passwords for accounts you’ll continue using. Instead, follow the device’s account-transfer process or explain how the buyer can set up new access. Include manuals or setup details for equipment included in the sale.
Use the final walk-through to resolve any missing key or access question before the handoff. A simple inventory helps both parties track what changed hands and prevents confusion about the agreed possession date. If you’re planning a sale, review your home-selling options as you organize the transaction.
What documents will you sign or review at closing?
Bring the documents tied to your sale and read each closing document before signing. The deed transfers ownership to the buyer and must be filed with the county recorder after closing. Your closing packet may also include an affidavit of title, closing statement, certificate of title, mortgage payoff documents, mechanic’s lien documents, a bill of sale, and a statement of information.
What local or state requirements affect what a home seller brings to closing? Local law, title company procedures, and the sale contract can affect the required documents and closing costs. Follow the closing agent’s instructions for your transaction, especially for original signatures or state-specific forms.
Only you or someone with power of attorney can sign your seller documents. Most closing documents require original wet signatures, although some supplementary forms may be accepted digitally. Many closing companies allow sellers to pre-sign, so confirm which papers need to be signed in person and which can be completed earlier. If someone else signs for you, the closing agent must approve the power of attorney in advance.
Review the seller’s closing statement line by line. It itemizes amounts due at closing, which may include transfer taxes, prorated property taxes, and homeowners association fees. Compare each charge and credit with your contract. Check that the sale price, mortgage payoff, and any agreed credits appear correctly. Your mortgage payoff statement shows the remaining balance; the closing statement shows how the transaction calculates your net proceeds.
What closing costs and fees does a home seller pay? Depending on local law, practice, and the contract, sellers may pay mortgage balances, real estate commissions, prorated taxes and bills, escrow, title or attorney fees, and a warranty payment if required. The contract and local rules determine which costs apply to your sale.
Gather the paperwork that supports the figures and terms. Keep your signed purchase agreement, payoff information, and records of any lien or repair issue affecting the property. The closing agent may also prepare affidavits confirming your right to sell and disclosing title matters that need resolution. Read each statement before signing, and ask about any figure that differs from the agreed terms.
How does a seller receive proceeds at closing, and what bank details are needed? Provide the closing agent with your bank account number or wire instructions. Sale proceeds first pay mortgages, other debts secured by the property, and closing costs. The remaining net proceeds go to your account.
Items included in the sale and promised repairs
Use the signed purchase agreement as your reference for every item that stays with the home. It identifies included appliances, window treatments, and other personal property. If the contract says the refrigerator remains, don’t remove it before the buyer’s final walk-through. Bring a copy of the agreement so you can resolve questions using the same written terms.
Prepare a simple inventory before closing. Group items by room and note anything the buyer expects to receive, such as a washer, patio set, or spare flooring. Use the inventory to compare the agreed list with what remains in the home and distinguish included property from belongings you plan to take.
- Bring the purchase agreement. Use its terms to identify included items and promised work.
- Bring proof of completed repairs. Keep receipts, paid invoices, or other records together with the related repair details.
- Gather manuals and warranty paperwork. Leave instructions for systems and appliances that stay with the house.
- Prepare a bill of sale if required for included personal property. It identifies items such as appliances or window treatments being transferred.
For promised repairs, match each commitment in the agreement with the completed work. For example, if the contract requires fixing a plumbing leak, organize the plumber’s invoice and any related receipt. If a repair remains incomplete, don’t describe it as finished. Record its status accurately and address it through the agreed transaction process before signing final paperwork.
A bill of sale can clarify which personal items transfer with ownership. Compare its descriptions with the purchase agreement before signing. “Kitchen appliances” may leave room for confusion, while a clear list names each appliance. Keep copies of both documents with your closing paperwork so the buyer and seller can refer to matching terms.
Place manuals, warranty documents, and service information in one labeled folder inside the home. Include instructions for the furnace, security system, or appliances that remain. Don’t leave paperwork for equipment you’re taking. If a warranty payment appears among your closing costs, compare it with the agreement and closing statement rather than assuming it applies.
Your driver’s license may help identify you during signing, but it doesn’t replace the sale records. Keep the purchase agreement and repair proof handy if an attorney or closing representative asks about a specific term. A mortgage payoff concerns the property’s financing; this checklist focuses on included items and completed work. Before you leave, confirm the agreed items are present and the buyer’s manuals are easy to find.
Seller responsibilities before closing
A smooth closing depends on work you complete before appointment day. Use a dated checklist to track paperwork, repairs, title questions, and possession plans. Send the title company the documents it requests 24-48 hours before the closing appointment, allowing time for review. Keep copies of every item you submit, including receipts and signed forms.
- Send title paperwork early. Give the title company the documents it requests 24-48 hours before the appointment so staff can review them.
- Review your closing figures. Get the final amount due from the closing agent 24-48 hours before closing, then compare it with your contract.
- Read the closing disclosure. Sellers should receive it at least three days before their scheduled closing; flag any figure that conflicts with the agreed sale terms.
- Finish agreed repairs. Compare each repair commitment with the work completed, and organize supporting paperwork for the closing file.
- Plan the final walkthrough. Complete your walkthrough 2-3 days before closing and note any unresolved condition or repair issue.
- Keep homeowners insurance active. Don’t cancel coverage until the county recorder records the ownership transfer.
Prepare for signing before you leave home. Put your government-issued photo ID with the closing papers, and confirm the appointment location and signing instructions. If you can’t attend, arrange a power of attorney and have the closing agent approve and notarize it in advance. A last-minute substitute can delay signing if the closing agent hasn’t approved the paperwork.
Use the final walk-through to compare the home with your agreement. Confirm that you completed promised repairs and left included items in place. Write down specific concerns, such as an unrepaired leak or an appliance listed in the contract but missing from the home. Share those details with the closing agent before signing instead of relying on a verbal reminder later.
Keep insurance active through the recorded transfer, not merely through the appointment. Signing may not be the only step in completing an ownership transfer, so keep coverage active until the transfer is complete. Compare your planned move-out date with the possession terms, too. If the contract gives the buyer possession after closing, coordinate access and remove your belongings by the agreed date.
For a more organized sale, use a home-selling plan to track documents, repair commitments, walkthrough findings, and closing tasks in one place. Mark each item complete only after you send, review, or resolve it. That simple record helps you see what remains before the title company prepares the final transfer.
Congress Realty: Multiple Listing Services
Congress Realty offers Multiple Listing Services for homeowners preparing to sell. An MLS listing can support your marketing before you reach the closing checklist stage. Once you accept an offer, keep your attention on the contract, required documents, repair commitments, and handoff details. Those steps help you manage the transaction with clarity while staying in control of your decisions.
If you’re planning a sale and want MLS support, consider Congress Realty as an option during the listing stage. The service fits homeowners who want to handle their sale directly while using Multiple Listing Services to market the property. Explore your next step at congressrealty.com or contact Congress Realty.
Set Up Your Sale for a Confident Finish
Closing day is easier to manage when you make key decisions before an offer arrives. Decide how you want to market the home, who will coordinate transaction details, and where you’ll keep signed paperwork. A dedicated digital or physical folder gives you one place to organize documents and track decisions throughout the sale.
Use this checklist as a starting point, then tailor your preparation to your transaction. What to bring to closing as a seller depends on the documents, payment instructions, and possession terms connected to your sale. Keep your own notes, raise questions while there’s time to address them, and make sure each agreed step has a clear owner.
If you’re preparing to sell and want support with the listing process, contact Congress Realty about your sale. You can choose your next step with a clearer plan and stay in command of the process.
Frequently Asked Questions
What can home sellers expect on closing day?
Expect to review and sign transaction documents, resolve any final questions, and complete the ownership transfer. A seller’s appointment typically takes 1-2 hours, though delays can change the timing. Plan to arrive 15-30 minutes early, allowing time to check in and organize your papers. The closing may take place at a title company, and the exact process depends on the transaction and local practice.
What documents should a home seller bring to closing?
Bring the documents requested by the closing agent, along with your signed purchase agreement and records tied to the sale terms. For example, keep a repair invoice or an agreed credit document handy if it explains an entry on the closing statement. Sellers with a paid-off home may need the deed. Organize paper and digital copies separately so you can quickly find a specific record during signing.
What identification does a seller need at closing?
Bring a valid government-issued photo ID, such as a driver’s license or passport. Check the expiration date before your appointment, since notarization requires valid identification. Title companies commonly require one ID, while some ask for two. If someone else will sign for you under power of attorney, the closing agent must approve the document in advance. Make sure every seller who will sign has suitable identification.
Does a seller need to bring keys, garage remotes, or access codes to closing?
Bring the property access items if the buyer takes possession at closing. These may include house keys, garage remotes, mailbox keys, and security codes. Put them together and label keys by door or use so the buyer can identify each one. If your contract sets a later possession date, coordinate the handoff for that date instead. Don’t transfer access before the agreed possession time.
What paperwork must a seller complete before closing?
Complete and return the documents requested by the title company, and address open title questions before the appointment. The title search can identify deeds, mortgages, liens, assessments, and other public records affecting ownership. Send requested paperwork 24-48 hours before closing to allow time for verification. If a title issue or promised repair remains unresolved, share its status with the closing agent rather than waiting until signing.
Does a seller need to bring a cashier’s check or pay anything at closing?
Bring a certified check only if the escrow officer requests one, and follow the exact payee and amount instructions. A personal check generally isn’t accepted for closing fees. The seller’s costs depend on local practice and the sale contract; possible charges include mortgage payoff, prorated taxes, and title or attorney fees. Review your final figures with the closing agent before arranging payment.
What happens at a real estate closing, step by step, for the seller?
First, check in and present identification. Next, review the closing statement and ask about any entry that differs from your agreed terms. Then sign the deed and other required documents, using original signatures where requested. The closing agent coordinates payoff of debts secured by the property and closing costs. After signing and funding, the deed goes to the county recorder, and you receive any remaining proceeds through the agreed method.