
Congress Realty is a flat-fee MLS brokerage serving Phoenix, offering sellers listings on the same MLS with the same exposure as listings paid with a full commission. Use this seller-focused guide to learn how to prepare your house for a final walk-through with a clear plan for the buyer’s last visit before closing. Congress Realty serves sellers in Arizona, Alaska, California, Idaho, Louisiana, Montana, Nevada, New Mexico, Oregon, Texas, Utah, and Washington.
It’s natural to wonder what the buyer will check or whether an unfinished repair or an item left behind could complicate the handoff. The walk-through focuses on the home’s condition and agreed repairs. It isn’t a second home inspection, so focus your preparation on the written commitments and a straightforward handoff.
Organize repair records, make a plan for any unresolved concern, and prepare the property without turning the final visit into another inspection or staging project. A practical checklist can help you stay focused and avoid preventable surprises.
Key Takeaways
- Use the written agreement to identify required repairs and items that must remain in the home.
- Follow a room-by-room checklist to track completed repairs, belongings to remove, included items, and basic cleaning.
- If the buyer raises a concern, document it, compare it with written commitments, and communicate clear next steps.
- Plan your countdown: review the agreement first, follow up on repairs before packing, and save the final sweep for last.
- Learn how to prepare your house for a final walk-through with an organized checklist that keeps the buyer’s visit focused.
Why a Seller’s Final Walk-Through Preparation Matters in Phoenix
Congress Realty began operations in 2002, and its listings provide the same exposure as listings paid with a full commission. For sellers, understanding how to prepare your house for a final walk-through starts with knowing the purpose of this visit: the buyer’s last check of the home’s condition before closing.
The buyer compares the property with the purchase agreement and the condition they expected when they agreed to buy it. They may check whether you completed agreed repairs and whether the home can transfer in the condition the agreement describes. Preparation is practical, not cosmetic: review written commitments, keep records of completed work, and make the property accessible for the buyer’s review.
The buyer uses a final walk-through to verify the home’s agreed condition; an inspector uses an earlier inspection to evaluate the property in greater depth. The walk-through doesn’t replace a professional inspection, and it isn’t a fresh inspection or a general opportunity to renegotiate. It’s one step in the broader real estate transaction, where the buyer checks the home’s condition and agreed repairs before closing.
What the buyer is checking during the final walk-through
Think of the visit as a comparison between the home today and the written agreement. The buyer may check whether you completed agreed repairs, whether included items remain, and whether the property’s condition has changed since the agreement. They’re assessing whether the home matches the transaction terms, not asking you to improve it beyond what you agreed to.
Keep repair records and the agreement easy to reference. If a concern comes up, documentation can help distinguish an unfinished commitment from a newly noticed issue. Respond to the specific concern and communicate through the transaction rather than treating every observation as an automatic request for new work.
How seller preparation differs from staging
Staging aims to make a home appealing to prospective buyers. Final walk-through preparation focuses on practical details tied to the sale: agreed repairs, the property’s condition, and items the agreement says should remain. You don’t need to recreate the polished look of a showing. Prioritize a straightforward handoff and make the home accessible for the buyer’s condition check.
Preparation also differs from a professional inspection or repair assessment. You don’t need to diagnose every system during this visit. Review what you and the buyer agreed to, check the work you arranged, and note any unresolved matter so you can communicate about it accurately. A focused plan helps you spend time on the issues that matter to the transaction.
How to Prepare Your House for a Final Walk-Through: The Core Checklist
A reliable checklist starts with the written agreement, not assumptions about what every buyer expects. Review the purchase agreement and repair commitments to identify what you need to complete and what you need to leave. This keeps preparation focused on the sale instead of turning the final visit into a new inspection or an open-ended improvement project.
Repairs, included items, and paperwork
Before marking a repair complete, compare the finished work with your exact written commitment. Gather receipts, work records, or other documentation you have so you can explain what you did. The buyer may not need a particular document unless your agreement says they do. If work remains, note what’s unfinished and communicate that update promptly.
- Agreed repairs: Review each written commitment and check the finished work against it.
- Unresolved work: Record what remains, the steps you’ve taken, and any update you can share.
- Included items: Use the agreement to confirm which appliances, fixtures, or other items must stay. Don’t rely on memory or assumptions.
- Specified systems or conditions: Check utilities, appliances, and other property conditions only as your agreement requires. Don’t create extra requirements based on a generic checklist.
Rooms, belongings, and handoff readiness
For each item, ask: does it belong to you, or does the agreement require you to leave it? Remove personal belongings that aren’t part of the sale, then check less visible spaces. Use the same process indoors and in accessible exterior areas. Aim for a clear handoff, not a display staged for another round of showings.
- Living areas and bedrooms: Remove personal items, packed boxes, and debris. Check closets and storage spaces for anything you plan to take.
- Kitchen and bathrooms: Check cabinets, drawers, and counters for your belongings. Confirm that you’ve left the items the agreement says to leave.
- Garage and storage areas: Look behind doors and in corners for tools, supplies, or other belongings you might overlook while packing.
- Accessible exterior spaces: Check patios, yards, and other areas included in the handoff for personal items and loose debris.
- Basic cleanliness: Remove trash and sweep the floors. Follow any specific cleaning or condition terms in the agreement.
Keep the final sweep practical. Don’t assume you need to test every appliance or meet a particular utility standard unless your written agreement requires it. This focused review helps you understand how to prepare your house for a final walk-through without confusing seller preparation with an inspection or repair assessment.
Final sweep: Match repairs to written commitments, remove belongings the sale doesn’t include, leave agreed items in place, and clear away trash and debris.
If you’re organizing the broader sale alongside this checklist, Congress Realty’s home-selling options provide a place to review seller support.
What Should Sellers Do If the Buyer Finds a Problem?
A concern during the final walk-through can feel urgent, especially with closing ahead. Stay calm and factual. Listen, write down what the buyer noticed, compare it with the purchase agreement and written repair commitments, then communicate next steps through the people handling the transaction. This helps everyone discuss the same issue without guessing at responsibility or outcome.
Use this sequence:
- Listen: Let the buyer or their representative describe the concern without interrupting or debating.
- Document: Record the location and visible details. If useful, keep relevant messages or photos with the transaction records.
- Compare: Review the concern alongside the purchase agreement and written repair commitments.
- Communicate: Share the facts and any available updates with the appropriate transaction professionals, then agree on how to discuss the next step.
Don’t promise that an issue will or won’t delay closing. The effect depends on the circumstances and the parties’ decisions. Clear, timely communication gives everyone a basis to address the concern without making predictions.
How to respond to an incomplete agreed repair
If the concern involves unfinished work, identify the specific written commitment and describe what remains. For example, distinguish between a repair that hasn’t started and one that’s underway but incomplete. Share accurate progress details and available supporting records. Don’t assume the buyer must accept unfinished work or agree to a particular solution. Keep the discussion centered on the written commitment and the facts.
If someone is still completing the work, explain its current status without presenting an estimate as a guarantee. Note what has been done, what remains, and when you expect to have another update, if you know. Send that information through the appropriate transaction channel so the parties can discuss it clearly.
How to handle a newly noticed concern
A newly noticed condition may not match any repair commitment. Describe what someone can observe, not what you think caused it. “There’s a damp area under the sink” reports an observation; “the pipe is leaking” makes a diagnosis. Avoid arguing about responsibility during the walk-through. Record the concern and share it promptly so the appropriate professionals can guide contract-specific decisions.
- Write down where the concern appears and what the buyer observed.
- Separate visible facts from possible causes or conclusions.
- Keep related communications and available records together.
- Ask the parties handling the transaction to guide the next discussion under the agreement.
Knowing how to prepare your house for a final walk-through also means having a calm plan for unexpected feedback. Stay precise, keep the written agreement close, and communicate updates without promising a particular remedy or closing outcome.
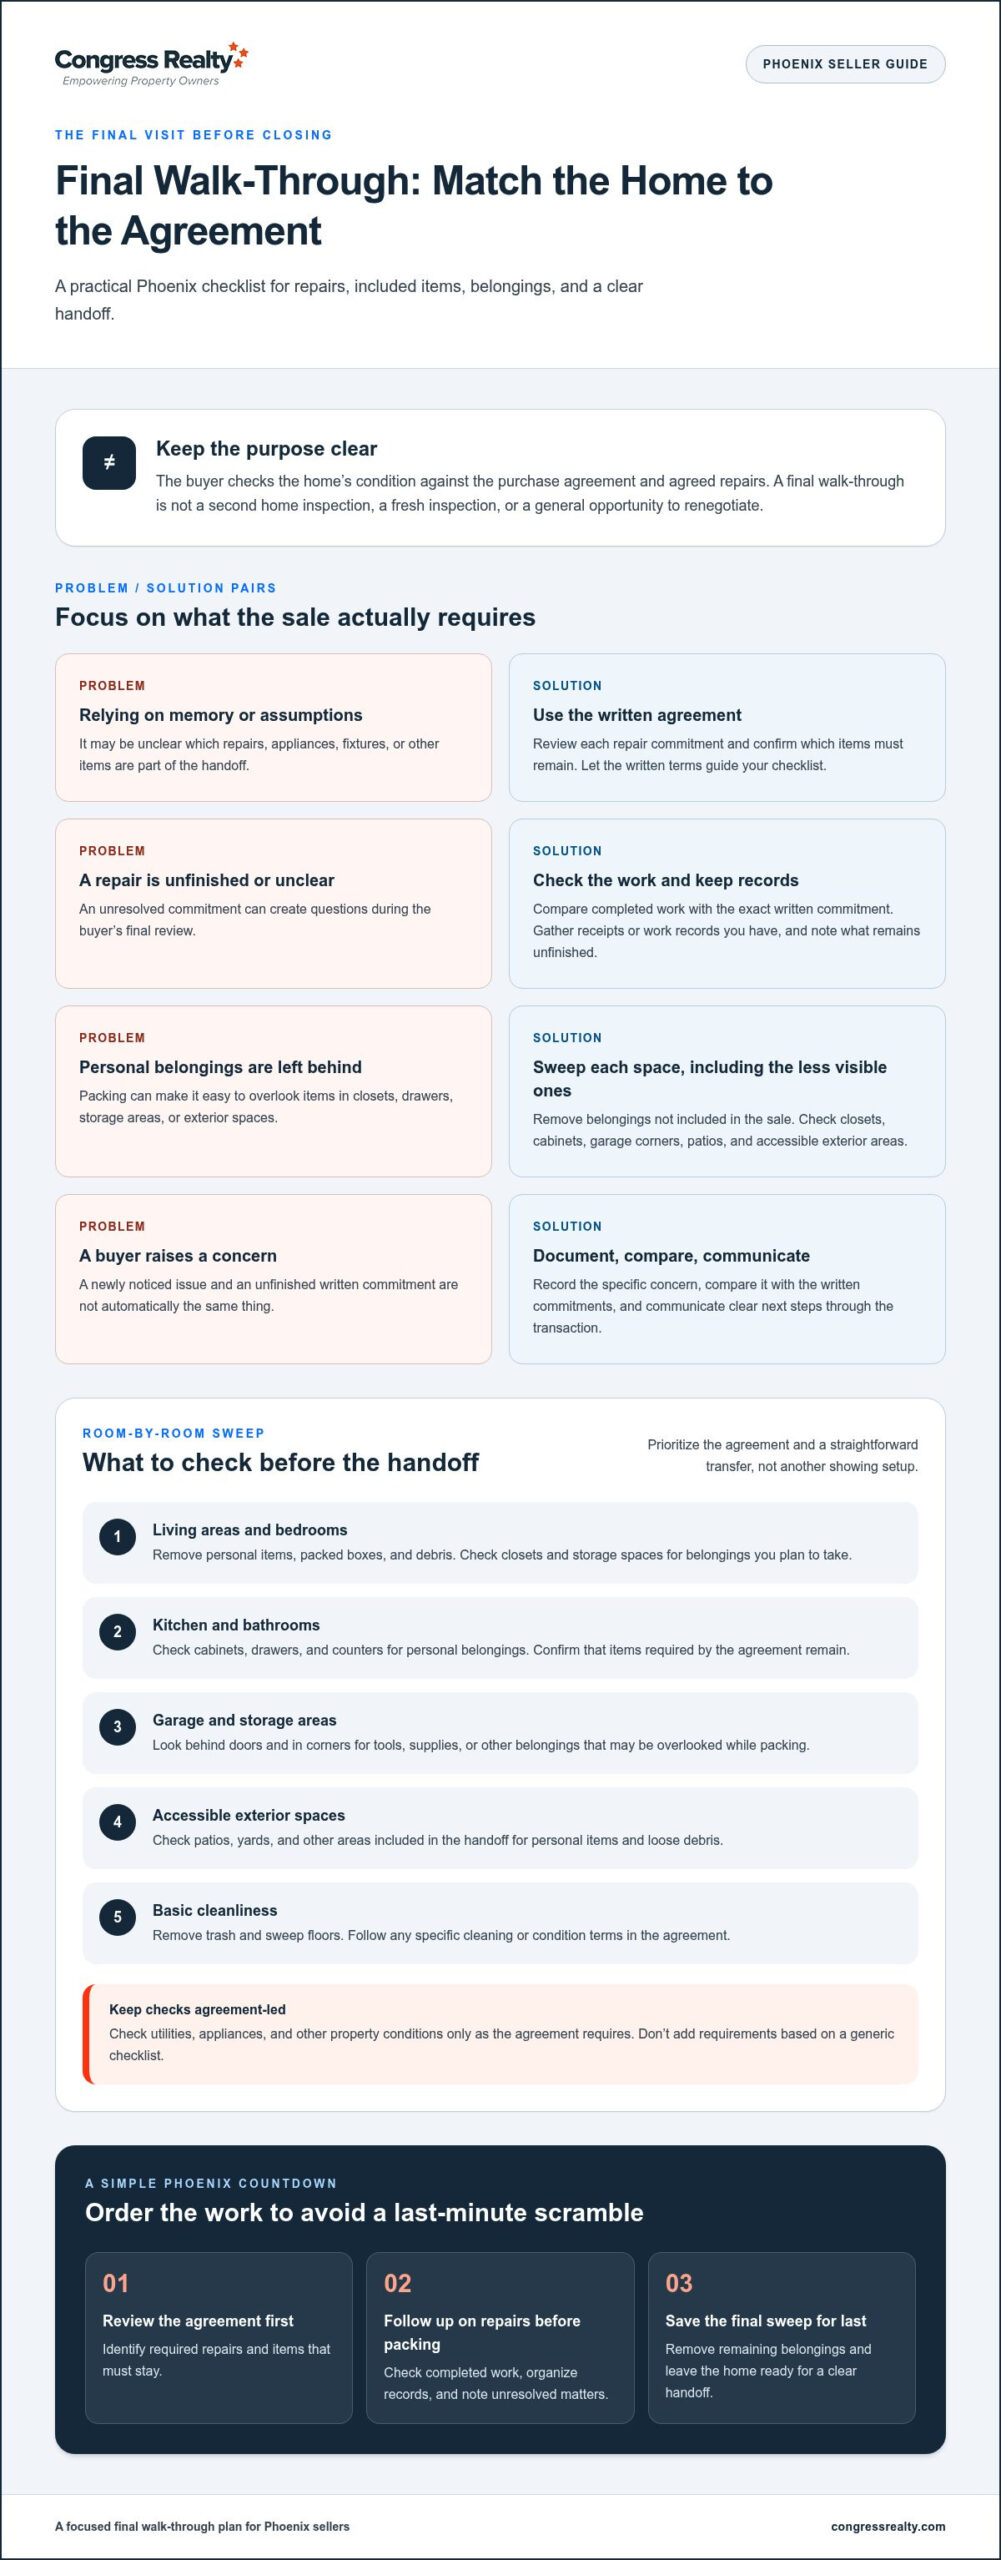
A Phoenix Seller’s Timeline for Getting the Home Walk-Through-Ready
Set your schedule by working backward from the buyer’s confirmed visit, not from a standard countdown. The preparation time depends on your move, any agreed repairs, and the timing arranged by the people handling the transaction. Keep the sequence practical: review the written agreement first, follow up on repairs before packing and removing belongings, then finish with a sweep after the home is clear.
Use these stages as a flexible plan. If a repair needs more attention or your moving schedule changes, update the people involved rather than assuming the visit or closing date will move.
Before moving out
Start with the purchase agreement and written repair commitments. Identify what still needs attention, including agreed work and items that should remain. Follow up on repairs while you still have access to records, contractors, or other useful details. Gather documentation as work progresses and flag anything that may remain incomplete. Don’t wait until you’ve packed everything to share an important update.
- Once the visit is scheduled: Review the agreement and make a short task list. Separate repair commitments from belongings to remove and items that should stay.
- While the home is still occupied: Follow up on agreed work before packing or moving out. Record accurate progress and pass along any concern about unfinished work through the transaction participants.
- As you pack: Keep items identified in the agreement separate from belongings you plan to take. This reduces the chance of removing something expected to remain or leaving behind something personal.
- After the home is cleared: Walk through rooms, storage areas, and accessible exterior spaces. Check for personal belongings or debris, then compare the home’s condition with written commitments and repair records.
- Before the buyer arrives: Do a final sweep for overlooked items and organize your records and updates. Coordinate visit timing through the transaction participants rather than relying on a customary date.
After the home is cleared
An empty home makes missed belongings and changes in condition easier to spot. Check closets, cabinets, storage spaces, and accessible outdoor areas, then confirm that included items remain where expected. Keep the written agreement nearby so you can answer questions by referring to what the parties documented, not by relying on memory.
Finish by checking that the home’s current condition aligns with your documented repair work and written commitments. This schedule helps you prepare without treating the walk-through as a full inspection or adding tasks the agreement doesn’t require. If a concern remains, share a clear update promptly; don’t promise a particular resolution or closing outcome.
A flexible plan keeps the final steps manageable. For a broader look at how to prepare your house for a final walk-through as part of managing your sale, explore seller support options.
Make the Final Walk-Through a Clear Step Toward Closing
A straightforward handoff comes down to three habits: follow the written agreement, document completed work, and communicate unresolved items clearly. These steps help you prepare without guessing what the buyer expects or treating the final visit as another inspection. Keep your records organized and updates factual, especially if a repair or other commitment still needs attention.
A concise final readiness check
Before the buyer arrives, compare completed repairs and items that should remain with the written agreement. Make one last pass through the home, including storage areas and accessible spaces, to catch belongings you may have missed. Keep a simple record of any unresolved item and related communication. This gives you a clear reference if a question comes up during the visit.
- Follow the agreement: Use the written terms and repair commitments as your guide.
- Keep records: Organize available documentation for completed work.
- Communicate clearly: Share updates about unfinished or unresolved items through the transaction participants.
- Make a final sweep: Check for personal belongings and confirm that agreed items remain.
Don’t assume that a tidy home alone settles every question. A clean sweep helps with the handoff, while the agreement and repair records help clarify what the parties committed to. If the buyer raises a concern, refer to those records and explain what you know. Avoid promising that an issue won’t affect closing or predicting a specific result.
Where seller support fits into the process
Organizing the walk-through is one part of managing a home sale. Congress Realty’s Full Service Option includes paperwork, contract negotiation, and documentation services for sellers who want support with transaction steps. Congress Realty brings over 20 years of real estate experience to its work, but no support option can guarantee a sale, sale price, or closing outcome. You remain in control of your preparation and decisions.
Use the same practical approach throughout your sale: check the written terms, keep useful records together, and share clear updates when something remains unresolved. An organized final visit can make the handoff easier to understand for everyone involved, without adding unnecessary last-minute tasks.
If you’re planning a sale and want to review the available support, explore selling options.
Move Into the Closing Steps With Confidence
The final walk-through is one part of the handoff, not a measure of how perfectly you staged your home. As you plan how to prepare your house for a final walk-through, focus on clear expectations and accurate communication. That practical mindset helps you stay focused on the transaction instead of getting pulled into last-minute uncertainty.
Every sale has its own details, so let your written agreement and the people handling the transaction guide your next steps. If you want support with the paperwork and contract process, Congress Realty’s Full Service Option can help you manage those transaction tasks. Congress Realty has served sellers since 2002 and brings over 20 years of real estate experience to the process.
For sellers in Phoenix, the right level of support depends on how you want to manage your sale. Explore seller support options and take your next step with a plan that keeps you in control.
Frequently Asked Questions
What should sellers fix before the final walk-through?
Complete the repairs you agreed to in writing, and review each commitment before arranging additional work. The best way to decide how to prepare your house for a final walk-through is to use the signed agreement and repair documents as your guide. If you discover a separate issue, record what you observe and share it with the people handling the transaction. Don’t assume every new concern requires a repair.
Should the seller be present during the final walk-through?
The seller doesn’t need to assume they should attend. Coordinate access and timing through the transaction participants and follow the agreement. Clarify access arrangements in advance rather than arriving unexpectedly or leaving the buyer without a way to enter. You can make the visit easier by organizing repair records and having the home ready at the scheduled time.
How clean should a house be for the final walk-through?
In Arizona, the expected condition is generally broom-swept: remove personal belongings and trash, then sweep the floors. A professional cleaning isn’t generally required unless the purchase agreement says otherwise. Focus on leaving the home free of debris so the buyer can view its condition. For example, clear packing materials from a room and check drawers or closets for items you meant to take.
What happens if the buyer finds a problem during the final walk-through?
The buyer can raise the concern, and the parties can review it against the agreement and written repair commitments. Ask for a clear description of what they noticed, then keep your response factual. A new mark on a wall, for example, differs from a repair that the agreement required but you haven’t completed. Share relevant records and updates through the transaction participants, and avoid guessing at a remedy.
Is the final walk-through the same as a home inspection?
No. The final walk-through gives the buyer a chance to check the home’s current condition and confirm agreed work before closing. A home inspection takes a broader look at the property and its systems. The walk-through shouldn’t become a new inspection or a general request for unrelated improvements. If the buyer notices something unexpected, keep the discussion focused on the observation and the written terms.
What should sellers leave in the house before the final walk-through?
Leave items the purchase agreement says come with the home, and remove belongings that aren’t part of the sale. Check the agreement before deciding about appliances, fixtures, or other items, since expectations can differ between transactions. If keys, manuals, or other handoff materials apply, organize them in a place the buyer can find. Don’t leave valuables or personal documents behind by mistake.
Can the final walk-through delay closing?
It can lead to further discussion that affects the closing schedule, but a concern doesn’t automatically mean closing will be delayed. The outcome depends on the issue, the agreement, and the parties’ decisions. If the buyer identifies a problem, share accurate information promptly and let the transaction participants discuss the next step. Avoid promising that closing will proceed on schedule or predicting a delay before the parties address the concern.